 |
| Pretty Pumpkin |
If you haven't been in the first grade for awhile, you may have forgotten how the paper mache process works! It's still a messy project, but I must admit I had fun! You remember my fake pumpkin search from last week? Well, the saga continued and I was still searching for one more pumpkin but I finally gave up! I couldn't find exactly the pumpkin I was looking for so I decided to make my own!
My paper mache pumpkin steps:
Make the paste first using 5 cups of water and 1 cups of flour, you might have to add more flour (consistency of cooked pudding)
Many paper strips (I used white printer paper because I didn't have newspaper) cut 1 inch wide
 One medium size balloon (from the dollar store)
Thin ribbon (or you could use string)
- Pour 5 cups water into a pan and add flour.
- Whisk flour and water and cook for 3 minutes over low-medium heat.
- Pour the mixture into a medium bowl (I used my Pampered Chef batter bowl). It should be smooth.
- Let it cool - it takes about 30-45 minutes.
- While your paste is cooling, cut strips of paper, you'll need about 20 sheets of paper if you're using copy paper.
- To get your pumpkin shape started, blow up your balloon to the size you want your pumpkin, but don't tie it yet.
- To make the ridges for the pumpkin shape: Take your ribbon (or string) and wrap it around the pumpkin. Start at the top where you would tie the balloon, go around the entire balloon and end at the top, add about 4 inches to each end of ribbon (so you can tie it - but don't tie it yet) and cut the ribbon.
- Let the air out of the balloon and cut 3 more pieces of ribbon using the first one as your guide.
- Now, don't panic, this sounds confusing but it's really not hard. Take the bottom ends of the ribbon and tie them together with the top ends of the ribbon (it should resemble a circle).
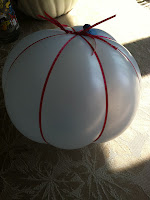 Blow up the balloon almost to the size you want, hold the top with your fingers, and with your other hand, slip the ribbon circle over the balloon. Then blow up you balloon slowly, the ribbon should start getting tighter. This is the time when you can adjust the ribbon over the balloon to get the ridges in your pumpkin. When your ribbons are in place, tie your balloon at the top. (Your ribbons ends will be at the top also). Be patient, it might take a couple of tries. It might be helpful if you are having problems to have someone hold the balloon for you while you are adjusting the ribbon. I have also heard of people using rubber bands instead of ribbon or string for this step.
- Ok - that was the worst part. Take a deep breath and enjoy a cup of coffee!
- Start to cover your balloon with the strips of paper, one at a time, dip the paper into the paste. Using your fingers, make sure both sides of the strip are covered, and don't have too much paste on the paper or it will take longer to dry.
- I covered the balloon with one layer of paper, then set it in a large bowl outside in the sun to let it dry.
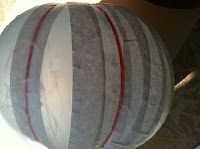 I applied 3 layers of paper strips in total. You want to make sure each layer dries before you apply the next layer. It takes several hours. I let mine sit overnight before I painted it.
- After my pumpkin was dry, I cut the top of the balloon off. When I did that the ribbon pulled away from the sides of the pumpkin so I pulled it out. I don't think you have to do this.
- I looked for something to use a stem for my pumpkin and ended up finding a piece of potpourri that fit in the top perfectly! Use what you have!
- Before I painted I sanded the bottom lightly to make it more even. I left the imperfections of the paper because I like that look. You could lightly sand your pumpkin if you wanted a smooth finish.
- Paint your pumpkin. I used 2 coats of antique white acrylic paint, then finished with mod podge (matte finish) and I topped mine with a doily (of course)!!


 |
| almost ready for paint |
|
| done! |
~ Simply Tammi